INTERNET TEACHING LAB: CISCO ROUTER BASICS
INSTRUCTOR VERSION
OVERVIEW
In this lab, we will explore some of the basic information on how to configure a Cisco router. In particular, we will see how to access the FSU Computer Science Internet Teaching Lab routers through the Cisco 2511 firewall router, also known as R6. From that router, we will use a feature called “inverse telnet” to access other lab routers through external RS-232 cables. We will also explore some of the router modes including user mode, enable mode, global configuration mode, and sub configuration mode. For additional information you can access the Cisco IOS manuals online at http://www.cisco.com. (From the Cisco home page, choose Technical DocumentsàDocumentation Home PageàCisco IOS Software ConfigurationàCisco IOS Release 11.1àCisco IOS Configuration Guides and Command References).
BACKGROUND
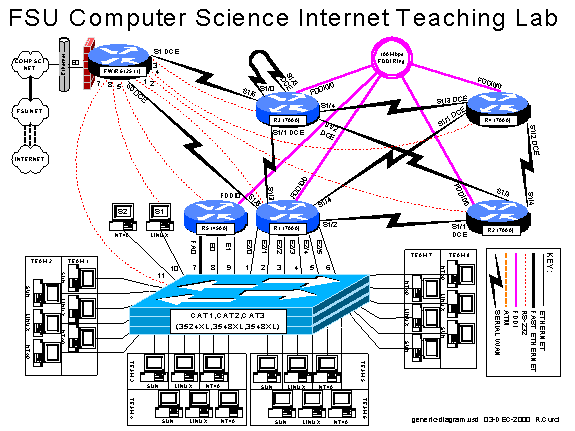
The ITL lab consists of six Cisco routers labeled R1, R2, R3, R4, R5, and R6; three Cisco catalyst 3500XL series ethernet switches, and several PCs. Cisco routers run an operating system called Cisco IOS or Cisco Internetwork Operating System. Inside the lab network, devices are numbered using IP private address space documented in the RFC1918 standard. Usually, the lab devices are numbered with the block of class C IP networks from 192.168.1.0/24 through 192.168.254.0/24. (If you are unfamiliar with the “/24” notation, it simply indicates the length of the subnet mask. For example, “/24” indicates a network mask of 255.255.255.0.) Routers R1, R2, R3, R4, and R5 are programmed by students to implement a series of lab exercises to learn about networking. Router R6 also called the “firewall” provides security and connects the lab network to the Computer Science departmental network and Internet. Only limited access is granted to students on this router to prevent changes that might compromise the integrity of the firewall. The firewall uses access lists to selectively block traffic on its ethernet interface. In particular, TELNET access is only permitted when originating from the FSU Computer Science departmental server XI.CS.FSU.EDU. Since the private IP address space is unknown on the Internet backbone, even without these access lists, the lab devices would be unreachable from the Internet. The firewall also performs another important function called “network address translation” or NAT. NAT is configured such that IP packets originating from the lab network will be translated where the source IP address of the packet is replaced by the R6 ethernet address so that it will be globally routable. When the destination server responds, R6 performs the translation in reverse. When enabled, this will allow PCs inside the lab network to access devices outside the lab when communication is initiated from inside the lab only. This will allow you to do things like download files with a web browser on the lab PCs from outside servers. For more background information, see the paper entitled “FSU Computer Science Internet Teaching Lab” which can be found at http://websrv.cs.fsu.edu/~curci/itl.
PART1
– Log into the Cisco 2511:
The Cisco 2511 firewall access router labeled R6 can be accessed in any of 3 ways:
1. Dumb Terminal or Terminal Emulator configured for 9600 baud and DEC VT100 emulation connected the router’s RS-232 console port.
2. TELNET to ethernet interface E0 from XI.CS.FSU.EDU.
3. TELNET to any router R6 interface from inside the lab network. (Only works when the lab routers are configured to provide connectivity.)
We will use the second method. TELNET from XI.CS.FSU.EDU to the R6 interface E0 will allow you to log into router R6. You can TELNET either using the DNS name ITL1.CS.FSU.EDU or the IP address 128.186.121.88. Access lists on interface E0 will allow access only from XI.CS.FSU.EDU, so you will not be able to TELNET in from any other system outside the lab network. When you are connected, the router prompts you for the user mode password that should have been given to you by your instructor. You will also want to enter the command “enable 2” to increase your security level which will enable some commands otherwise not allowed in the user mode.
xi%
telnet itl1
Trying
128.186.121.88...
Connected
to itl1.
Escape
character is '^]'.
User
Access Verification
Password:
xxxxxx
fw/r6>enable
2
Password:
xxxxxx
fw/r6#
Note that the boldface type above indicates the part that you must type, although you should substitute the password for the “xxxxxx”.
Note on enable levels:
Cisco routers have 16 privilege levels called “enable levels” numbered 0 through 15. Level 0 has the least privilege and cannot make any changes and is also called “user mode”. Level 15 is the most privileged and can make any changes and is often simply called “enable mode”. Intermediate levels are used to provide access between the two extremes. For example, in user mode you cannot list the startup configuration or change the configuration. However, you can set up an intermediate level that allows viewing the startup configuration but does not allow changing the configuration. That is what we have done on the firewall/R6 router with enable level 2. This prevents you from making changes to R6 but allows you to at least view the configuration to see what is going on. The command “enable X” prompts for a password and if accepted, changes to enable level X. If X is omitted, 15 is assumed. On the routers you will program, R1 through R5, we will only use enable levels 0 and 15 and refer to them as “user mode” and “enable mode”. Note that the command prompt changes between these two modes-- “user mode” has the “>” symbol while enable mode has the “#” symbol.
The RS-232 console ports on routers R1 through R5 connect to ports Line1 through Line5 on the 2511 respectively. You can connect to any of these routers across the RS-232 link by typing their name unless there is someone else already using the line. This feature is called “inverse telnet”. You can see if anyone else is logged into the firewall with “show user”. You can see any existing sessions you have with “show session”. Once connected to one of these lines, any characters you type are sent across the RS-232 link to the corresponding router and output from the router is displayed on your screen. The only exception is the special escape sequence that brings you back to router R6 – SHIFT-CONTROL-6-x. On your keyboard, press and hold the SHIFT key, press and hold the CONTROL key, then press the “6” key. Release all keys, then press “x”. You should now be back on router R6. The command “show session” will show you which sessions you have active. You can go back to your previous session by simply hitting return, or entering the integer session number displayed with the “show session” command. The command “clear line X” where X is the integer line number is sometimes necessary to clear an inactive session from an idle user. Here is a capture to demonstrate:
fw/r6#show
user
Line
User Host(s) Idle Location
0 con 0 r1 2w4d
*
18 vty 0 idle 00:00:00 128.186.121.41
fw/r6#show
session
%
No connections open
fw/r6#r1
Trying
r1 (128.186.121.88, 2001)... Open
r1# ß (RETURN and
SHIFT-CONTROL-6-x typed here)
fw/r6#r2
Trying
r2 (128.186.121.88, 2002)... Open
r2# ß (RETURN and
SHIFT-CONTROL-6-x typed here)
fw/r6#r3
Trying
r3 (128.186.121.88, 2003)... Open
r3> ß (RETURN and
SHIFT-CONTROL-6-x typed here)
fw/r6#show
session
Conn
Host Address Byte Idle Conn Name
1 r1 128.186.121.88 0 0 r1
2 r2 128.186.121.88 0 0 r2
* 3 r3
128.186.121.88 0
0 r3
fw/r6#clear
line 3
[confirm]y
[OK]
fw/r6#logout
(You have open connections) [confirm]y
Closing:
r1 !
Closing:
r2 !
Closing:
r3 ! Connection closed by foreign host.
xi%
Since only one person can use an RS-232 line at a time, if your network is already functional, it may be better to use TELNET from R6 to any of the other lab routers or PCs. By default, Cisco routers allow a maximum of 5 concurrent inbound TELNET sessions.
fw/r6#telnet
192.168.55.5
Trying 192.168.55.5 ...
Open
User Access Verification
Password: xxxxxx
r5>enable
Password: xxxxxx
r5#logout
Once logged into your team router go to enable mode. Use the command “show version” to see your router’s IOS version number and operating system image filename. A baseline router configuration file should be located on your router’s flash memory device on a file named “base-rX.cfg” where X is the integer ID corresponding to your router. You can also find a listing of the baseline configuration at the end of this document. Get a directory on your flash filesystem with the command “dir flash:” and verify that the baseline configuration file is present. View this file with “show file flash:base-rX.cfg” If everything looks right, copy the baseline configuration file to your router’s startup configuration with “copy flash:base-rX.cfg startup-config” and reboot with the new configuration using the “reload” command. Follow these steps carefully. After the last step, your router will take about 3 minutes to reboot. The following is an example of these steps on router R3 with some of the unimportant messages removed:
xi%
telnet itl1.cs.fsu.edu
Trying
128.186.121.88...
Connected
to itl1.
User
Access Verification
Password:
xxxxx
fw/r6>en
2
Password:
xxxxx
fw/r6#r3
Trying
r3 (128.186.121.88, 2003)... Open
r3#enable
r3#show
version
Cisco
Internetwork Operating System Software
IOS
(tm) GS Software (GS7-J-M), Version 11.1(24), RELEASE SOFTWARE (fc1)
r3
uptime is 2 days, 2 hours, 47 minutes
System
restarted by power-on
System
image file is "gs7-j-mz.111-24.bin", booted via flash
cisco
RP1 (68040) processor (revision A0) with 65536K bytes of memory.
...
r3#dir
flash:
-#-
-length- -----date/time------ name
1 4025994
--- -- ---- --:--:-- gs7-j-mz.111-24.bin
2 1289 --- -- ---- --:--:-- base-r3.cfg
165776
bytes available (4028528 bytes used)
r3#show
file flash:base-r3.cfg
version
11.1
service
udp-small-servers
service
tcp-small-servers
!
hostname
r3
...
r3#copy
flash:base-r3.cfg startup-config
Warning:
distilled config is not generated
[OK]
r3#reload
Proceed
with reload? [confirm]y
%SYS-5-RELOAD:
Reload requested
System
Bootstrap, Version 5.0(5), RELEASE SOFTWARE
RP1
processor with 65536 Kbytes of main memory
Reading
gs7-j-mz.111-24.bin from flash memory
...
Press
RETURN to get started!
r3>
r3>enable
Password:
xxxxx
r3#
PART2 – IOS MODES:
The Cisco IOS software can operate in four modes:
1. User Mode
2. Enable Mode
3. Global Configure Mode
4. Sub Configure Mode
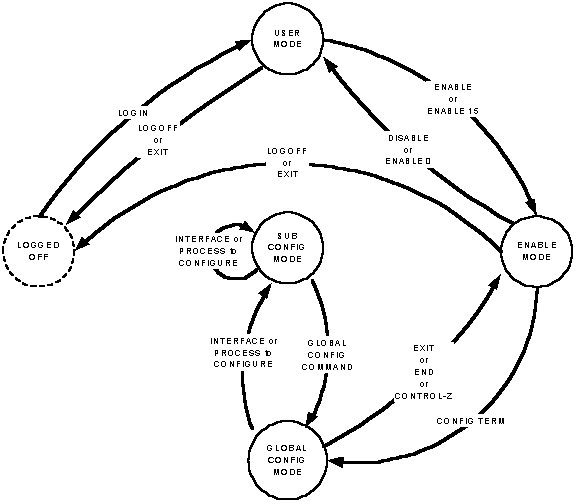
The diagram above shows you how to switch between router modes. The following example shows logging into a router (user mode), using the “enable” command to go to enable mode, and using the “configure terminal” command. I then enter a simple configuration to assign an IP address on two interfaces and enable the RIP routing protocol. Note how the command prompt changes as we change between modes. Whitespace is ignored, so I have added whitespace in front of the sub config mode commands for clarity. Note also that a command prefixed with the word “no” negates the meaning of the command such as “shutdown” and “no shutdown”.
Configuration to be
entered:
ip classless
interface ethernet2/0
ip address 192.168.10.1 255.255.255.0
no shutdown
interface ethernet 2/1
ip address 192.168.20.1 255.255.255.0
router rip
network 192.168.10.0
network 192.168.20.0
no ip domain-lookup
Here is the captured session:
fw/r6#telnet
192.168.11.1
Trying 192.168.11.1 ...
Open
User Access Verification
Password: xxxxxx
r1>enable
Password: xxxxxx
r1#configure terminal
Enter configuration
commands, one per line. End with
CNTL/Z.
r1(config)#ip classless
r1(config)#interface
ethernet2/0
r1(config-if)#ip
address 192.168.10.1 255.255.255.0
r1(config-if)#no
shutdown
r1(config-if)#interface
ethernet2/1
r1(config-if)#ip
address 192.168.20.1 255.255.255.0
r1(config-if)#no
shutdown
r1(config-if)#router
rip
r1(config-router)#network
192.168.10.0
r1(config-router)#network
192.168.20.0
r1(config-router)#exit
r1(config)#no ip
domain-lookup
r1(config)#exit
r1#logout
When entering commands, you need only enter enough letters for it to be unique. For example, you can use “config t” in place of “configuration terminal”. You can also type the question mark “?” at any point to see your options. If your terminal emulates a DEC VT100, you can also use the UP, DOWN, LEFT, and RIGHT arrow keys to recall previous commands and edit them. Here is a session capture that makes the same router configuration as shown above but demonstrates using abbreviated commands and the built-in “?” HELP facility.
fw/r6#telnet
192.168.11.1
Trying
192.168.11.1 ... Open
User
Access Verification
Password:
xxxxxx
r1>en
Password:
xxxxxx
r1#conf
t
Enter
configuration commands, one per line.
End with CNTL/Z.
r1(config)#ip
clas?
classless
r1(config)#ip
classless
r1(config)#int
e2/0
r1(config-if)#ip
add 192.168.10.1 255.255.255.0
r1(config-if)#no
shut
r1(config-if)#int
e2/1
r1(config-if)#ip
add 192.168.20.1 255.255.255.0
r1(config-if)#no
shut
r1(config-if)#router
rip
r1(config-router)#net
192.168.10.0
r1(config-router)#net
192.168.20.0
r1(config-router)#exit
r1(config)#no
ip d?
default-gateway default-network dhcp-server
domain-list domain-lookup
domain-name dvmrp
r1(config)#no
ip domain?
domain-list domain-lookup domain-name
r1(config)#no
ip domain-lookup
r1(config)#^Z
r1#lo
Log into your router and modify the configuration to display a login message that says “Team X Router” replacing X with your team number using the “banner login” command. Also change your router’s command prompt from “rX” to “teamX” using the “hostname” command. Use the “show interface loopback0” and “show running-config” to view the configuration on your loopback0 interface. Delete your router’s loopback0 interface with “no interface loopback0” Verify it is gone with “show running-config”. Then put the interface back in with “interface loopback0” Make sure you remember to assign the interface an IP address and make sure it NOT shutdown. Since we have not saved any configuration changes in this part, if you get stuck, you can always use the “reload” command to reboot which will undo any changes you have made. Just remember that if you are prompted to save change, you should answer “NO”.
xi% telnet itl1.cs.fsu.edu
Password: xxxxx
fw/r6>r4
Trying r4 (128.186.121.88, 2004)... Open
r4>enable
Password: xxxxx
r4#config term
Enter configuration commands, one per line. End with CNTL/Z.
r4(config)#banner login "Team 4 Router"
r4(config)#hostname Team4
Team4(config)#^Z
Team4#
%SYS-5-CONFIG_I: Configured from console by console
Team4#show running-config
Building configuration...
Current configuration:
!
version 11.1
service udp-small-servers
service tcp-small-servers
!
hostname Team4
!
interface Loopback0
ip address 192.168.44.4 255.255.255.0
...
Team4#config term
Enter configuration commands, one per line. End with CNTL/Z.
Team4(config)#no interface loopback0
%LINEPROTO-5-UPDOWN: Line protocol on Int Loopback0, changed state to down
%LINK-5-CHANGED: Int Loopback0, changed state to administratively down
Team4(config)#interface loopback0
Team4(config-if)#
%LINEPROTO-5-UPDOWN: Line protocol on Interface Loopback0, changed state to up
%LINK-3-UPDOWN: Interface Loopback0, changed state to up
Team4(config-if)#ip address 192.168.44.4 255.255.255.0
Team4(config-if)#description Loopback Interface on Router R4
Team4(config-if)#no shutdown
Team4(config-if)#^Z
Team4#
%SYS-5-CONFIG_I: Configured from console by console
Team4#show running-config
Building configuration...
Current configuration:
!
version 11.1
!
hostname Team4
!
no ip domain-lookup
!
interface Loopback0
description Loopback
Interface on Router R4
ip address 192.168.44.4 255.255.255.0
!
...
Team4#
PART3
– Saving and Viewing Configurations:
Cisco routers have two configurations, the startup configuration, and the running configuration. Normally, when a router is booted, it reads in the startup configuration which is stored in flash memory. Once the router is running, the current configuration in RAM is called the running configuration. If no changes are made after booting, both the startup and running configurations will be the same. You can make changes interactively to the running configuration. You can also commit the changes to the startup configuration in flash or reboot which will cause any changes you have made to be lost. Here are the relevant commands:
-
show startup-config
List the startup configuration in flash to the screen.
-
show running-config
List the running configuration currently executing in RAM to the screen.
-
copy running-config startup-config
Copy the currently running configuration to the startup configuration in flash to commit any changes you have made. The committed changes will persist even after rebooting the router.
-
terminal length 24
Set the router to pause every 24 lines when displaying messages larger than 24 lines.
-
terminal length 0
Set the router to not pause when display messages, no matter how long they are even if they scroll off the screen. This is sometimes handy when using a terminal emulator to capture a command with lots of output.
-
reload
Reboot the router.
-
write erase
Completely erase the startup configuration. Use with care!
-
write
An old deprecated command that is a synonym for “copy running-config startup-config”
-
write terminal
An old deprecated command that is a synonym for “show running-config”
Your assignment is to capture your router’s running configuration to a text file, erase the startup config and reboot so your router will have no configuration, then get the your text file config back into the router and commit the changes. Afterwards, verify that your router will reboot with the appropriate configuration. Use the following steps to guide you through the process.
1. Log into your router and go to enable mode.
2. Configure your terminal session to inhibit paging.
3. Configure your terminal emulator to capture text.
4. Display the running configuration to your screen while simultaneously capturing it to a text file.
5. Stop capturing text and edit the captured text file with a text editor, removing any extraneous text.
6. Completely erase your router’s startup configuration with “erase startup-config”
7. Reboot your router with “reload”
8. After rebooting, you may see an error message indicating that the startup configuration is missing and get prompted by the auto configuration dialog. You should be able to simply press control-C to cancel the dialog.
9. Log into your router, go to enable mode, and list the running configuration to your screen. Compared to your captured text file in step 5 and explain which part of the configuration is still there and which part is missing.
10. Go to global configuration mode and use copy and paste to put the configuration back into your router.
11. List the running configuration and compared to your saved configuration from step 5. How do they differ? Fix any differences so the running configuration is identical to your saved configuration from step 5.
12. Save your changes by copying the running configuration to the startup configuration.
13. Reboot your router and verify it reboots with the correct configuration.
14. Log into your router and go to enable mode. Configure your session to not page every 24 lines. Set your terminal emulator program to capture text. Display the running configuration to your screen while simultaneously capturing to a text file. Get the text file into some text editor and clean up any extraneous text.
PART4 – Miscellaneous Commands:
Read up on the following commands and try them out on your router. Provide a brief explanation of what each does.
1. telnet
2. ping
3. traceroute
4. show version
5. show clock
6. show diagbus
7. show interface
8. show ip interface brief
9. show ip routing
10. show ip protocol
telnet w.x.y.z
TELNET to a remote host or router w.x.y.z, just like UNIX.
ping w.x.y.z
PING a remote host or router w.x.y.z, just like UNIX.
traceroute w.x.y.z
Trace the route to remote host or router w.x.y.z, just like UNIX.
show version
Display the Cisco IOS software version and additional info.
show clock
Display the time/date according to the router’s internal clock.
show interface
Display all router interfaces including lots of status information.
show ip interface brief
Display all router interfaces briefly, one per line, including
the up/down status and IP address if one is assigned.
show ip routing
Display the IP routing table.
show ip protocol
Display information any active IP routing protocols.
BASELINE ROUTER CONFIGURATION:
For completeness, here is a listing of the baseline router configuration mentioned in part 1 for routers R1, R2, R3, R4 and R5. The section labeled “COMMON:” is needed on all routers. The sections labeled “R1:”, “R2”, etc, are the router specific sections. These configurations should already be present on each router’s flash memory on file
“base-rX.cfg” where X is the integer identifier of the router.